


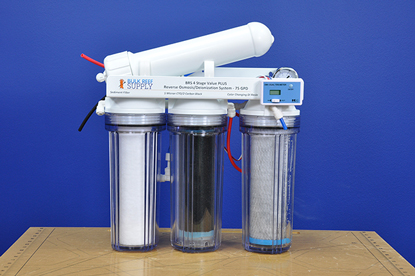
The first step in changing the RO membrane is to make sure the RO/DI unit is turned off just like when you change your pre-filters. Seeing as how you should have replaced those at least 3-6 times before needing to replace the membrane we will assume you are familiar with that process.
Next you’re going to remove the RO membrane housing from its clips. You do not need to remove the clips themselves from the RO/DI unit (they are attached to the system via screws). Just grab the membrane housing firmly and pull up and away from the unit and the housing will snap out.
Once you have the membrane housing removed you will need to disconnect the tubes from the fittings on the RO/DI unit. You could get by removing only the tube on the cap end of the RO/DI unit, but itcan much simpler to do with the housing removed entirely. Sometimes after sitting for three years the caps are tough to remove and a second set of hands will help.

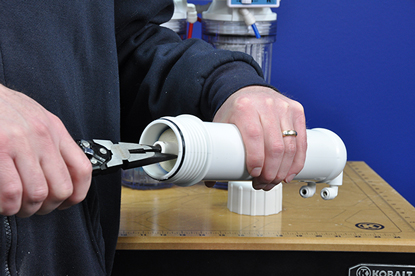
Our RO/DI unit’s all utilize Mur-lok push connect fittings. They are quite easy to install and they are equally easy to remove if you know how. To remove the tubing you want to press in and hold the collet against the fitting (red part in image). Looking at the fitting it is a small plastic ring that surrounds the tubing, it may be flush against the fitting now but if you were to pull on the tubing it would move outwards with the tubing. Press this piece against the fitting itself and pull the tubing out in the opposite direction.

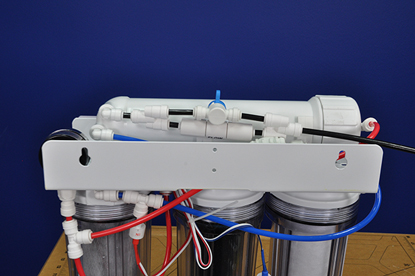
If removing the entire housing, be careful to note which color tubing goes into each fitting (it wouldn’t hurt to label them with a marker). The red tube enters the fitting on the cap. On the opposite side you have the waste water tubing (black) and the product water tubing (blue). Assuming the membrane is in its factory configuration with the cap/red tube on the left and the product/waste water fittings facing the back of the unit, the black waste water fitting is the one on top, the blue product water fitting will be on the bottom.
Once the membrane housing is removed you want to unscrew the cap from the membrane housing. Over 3-5 years (sometimes longer) they can be a bit tough to remove, you may need a partner! Remember, righty tighty, lefty loosey. Once the cap is removed it will reveal the membrane. Make sure to keep track of the two O-rings on the membrane housing. One of them should be in the cap and the other on the main body of the housing.
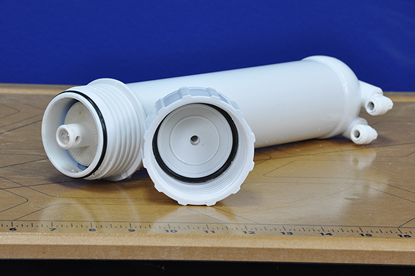
Now it’s time to remove the membrane from the housing. The membrane has a few O-rings that press against the membrane housing to create seals but other than that it isn’t held in with any sort of fasteners so you just need to pull it out. If you have small enough hands to reach in and pull it out then great! For the rest of us pliers will do the trick. It’s best to remove it by grabbing the plastic spindle in the middle. Keep in mind that the membrane itself is being disposed of, so don’t worry about grabbing onto it with pliers. Once you have a good grip you just need to pull out in the opposite direction.
Installation of the new membrane will be the opposite of removal. Remove your new membrane from its packaging and insert it into the membrane housing. In case you forgot the orientation from the last step, the end of the membrane with the 2 small O-rings on the end of the plastic goes in first, the end with the big O-ring is towards the cap. Push the membrane in by hand until it is snug. Once it is in go ahead and screw the cap back on.
At this point, it is easier to reconnect the tubes. Remember the red tube inserts into the cap. Assuming the waste and product water fittings are facing towards the back of the RO/DI unit the black line will go into the top fitting (the waste water) and the blue line will go into the bottom fitting (the product water).
Now you just need to push the membrane housing back into the membrane clips. Line the housing up on the two clips and push down firmly, the will snap into place. Now it’s just a matter of turning the unit back on and flushing the unit. There is a distinction to make when we are flushing the RO membrane after its initial installation vs flushing the membrane as regular maintenance. In normal maintenance you are opening your membrane flush valve to bypass the flow restrictor and rinse deposits off the membrane. When installing a new membrane you actually want to flush preservative out of the membrane itself so you want to keep your flush valve closed, allowing the unit to run like normal for an hour (and discarding the water). After an hour you can go back to collecting your water as usual and your membrane should be good for a few more years.